Chapter 9: PHYSICAL TRAINING

    1. Physical Training. Physical training (PT), as one of the five program elements of the Civil Air Patrol cadet program, has an important role at encampment. PT is the springboard for health and fitness programs that are critical to each cadet’s development. As such, PT is not designed as a punitive program, or intended to create a high-pressure atmosphere for participants. The primary purpose of PT is to increase fitness levels, emphasize the importance of fitness, promote teamwork, and develop each cadet's self-discipline to participate in fitness activities. PT provides an active beginning to the encampment training day and teaches cadets the military method for conducting PT.
    2. Conduct. The cadet NCO staff conducts PT. Cadet officers will participate in the formation, leading by example, and correcting poor performance. Perform PT in the following sequence: formation, warm-ups, stretching, calisthenics and/or activity, and cool-down.
    3. Formation. Use the following sequence of commands to form into double-arm interval to conduct PT. The First Sergeant will direct, at his/her command:
    4. Open Ranks, MARCH

      Ready, FRONT

      At Double Arm Interval, Dress Right, DRESS. The flight does dress right dress with both arms up. ELEMENT LEADERS DO NOT MOVE from their alignment; they simply put their left arms up.

      (do PT)

      Once Finished,

      Dress Right, DRESS. Done normally.

      Close Ranks, MARCH

    5. Warm-ups. After the flight is prepared for PT, the 1st Sgt begins warm-ups. Warm-ups are designed to stretch the tendons, ligaments and muscles. 1st Sgts will conduct warm-ups in an organized manner without regimentation. In order to warm up the joints, warm-ups should start small, increasing to large. Conduct warm-ups in sequence from head to toe, following the sequence identified in Figure 9-1, Begin by having cadets jog in place.
    6. Stretching. Flexibility is an important component of fitness and can assist cadets in performing PT. Stretching is designed to increase muscle length and improve tendon range of motion to prevent injury and to allow muscles to become stronger. Stretch sequentially from head to feet and use only static stretches. Conduct stretches in an organized fashion with regimentation and hold each stretch for ten counts. Stretch all major muscle groups. Provide personal stretching time. Selected stretches are depicted in Figure 9-2.
    7. Calisthenics. Calisthenics are conducted in a regimented fashion by the 1st Sgt and is designed to increase the heart rate of the cadet and prepare for aerobic activity. During the first PT period, the 1st Sgt should ask if cadets have questions, and should demonstrate the calisthenics if necessary. After cadets are familiar with the exercises, the 1st Sgt merely needs to say what the exercise is, command cadets to the start position and have them begin exercising in cadence. Recommended calisthenics are identified in Figure 10-3.

      1. Sequence. (Air Force method) Bring the unit to attention, and say the following things:
        1. The first exercise of the day is the [insert exercise here]. [Cadets echo exercise name]. Say "next" if the exercise is not the first of the day.
        2. It is a [count] count exercise. Most exercises are four count. Stretches should be ten count.
        3. We will do [number] repetitions. For stretches, the number of repetitions is usually two- one for each side. For four count pushups, the cadets are actually doing two pushups in each "repetition".
        4. I will count the cadence, you will count the repetitions. This means that the 1st Sgt will say, alone, "1, 2, 3," (the cadence count) and the cadets will finish with "1" (the repetition count).
        5. Start position is [at attention, in front leaning rest, etc.].
        6. Start Position, MOVE.
        7. Ready, BEGIN." "Begin" is used instead of "exercise" because this procedure also applies to stretching. The 1st Sgt will start with "1, 2, 3," and the cadets will finish with "1". This is followed by: First Sergeant: "1, 2, 3,"; Cadets: "2", continuing until the cadets reach the number of repetitions outlined in part (4) above.
        8. To halt the exercise, the 1st Sgt controls the formation by using a rising vocal inflection for the final repetition of the exercise (when counting cadence). Cadets say "Halt" on the last repetition instead of counting.
        9. After cadets have halted, they say in unison, "Permission to recover, 1st Sgt." The 1st Sgt gives permission by saying "RECOVER!" At this point the flights should clap and give short cheers/yells like "hoo-rah" for motivation-it’s odd at first, but it works great. Otherwise, the 1st Sgt may move directly into the next stretch or exercise (deny permission).
        10. The key to remember is to make it FUN and MEMORABLE. The more procedural and structured, the better- cadets always enjoy having a "story to tell back home." Original (or copied) chants and sayings are HIGHLY recommended (ex: 1st Sgt shouts from time to time "We love PT" and the cadets reply "We love PT"). Confidence and a projecting voice enhance the experience, even if the exercise isn’t tough for everyone.

      2. Calisthenics Instruction. You can instruct calisthenics in various ways. Ideally, the 1st Sgt will instruct their cadets using these two steps:
        1. First step. The instructor demonstrates the exercise, if necessary.
        2. Second Step. Both the cadets and the instructor participate.

    1. Activity. After calisthenics, the 1st Sgt should direct the aerobic activity of the day. This time period can be used for a group/wing run, administering the cadet fitness test, or some other activity. A common technique is for the 1st Sgt to allow organized runs as a flight initially, then to conduct runs as a squadron later in the week.
    2. Cool-Down. Never suddenly stop aerobic activity. This can cause pooling of the blood and can lead to a serious medical problem, depending on the intensity of the exercise. At the very least, this will teach a bad habit regarding PT and what to do at the conclusion of exercise. After the aerobic activity, have cadets slowly return to a normal heart rate by walking, then conducting some stretches. This will help both the cool-down and may help reduce soreness the following day.

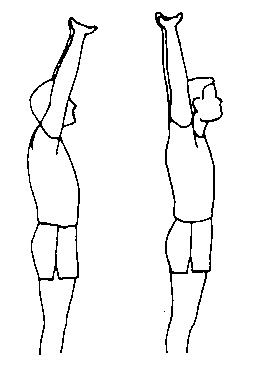
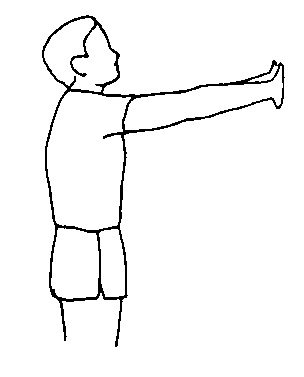
ARM AND SHOULDER WARM-UPS
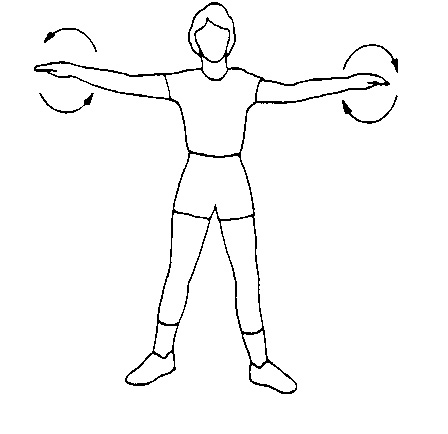
Position: Stand with feet shoulder width apart extend arms outward to shoulder height with palm downward.

Action: Rotate arms forward, beginning with a small circle and expanding to a large circle. Repeat in opposite direction.
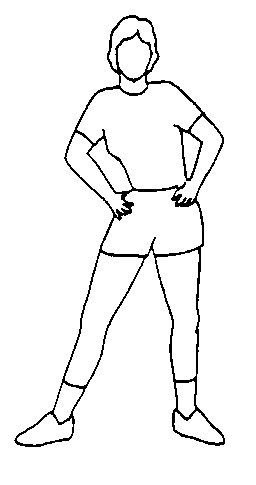
NECK WARM-UPS

Position: Stand with feet shoulder width apart. Place hands on hips.

Action: Roll the head slowly to the left, beginning with small circle and expanding to a large circle. Do not rotate neck beyond vertical—This action will unnecessarily compress the spine. Repeat in opposite direction.
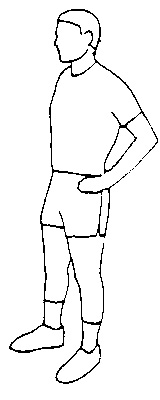
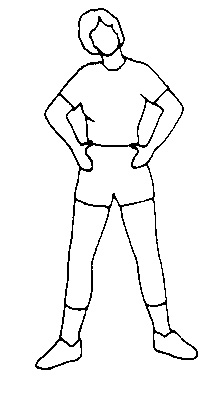
HIP WARM-UPS

Position: Stand with feet shoulder width apart. Place hands on hips.

Action: Rotate the hips clockwise while keeping the back straight. Start with a small circle and expand to a large one.

Repeat in opposite direction.

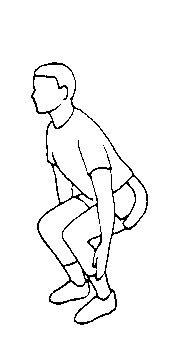
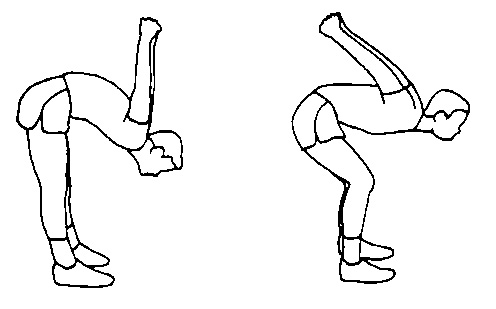
KNEE AND ANKLE WARM-UPS
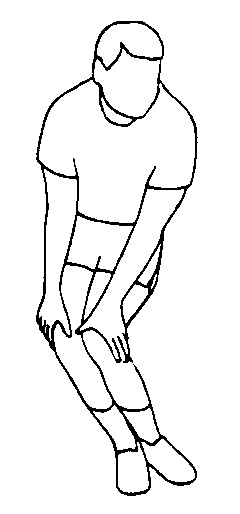
Position: Stand with feet together and bend at the waist with knees slightly bent. Place hands on knees.

Action: Rotate the knees clockwise. Repeat in the opposite direction.

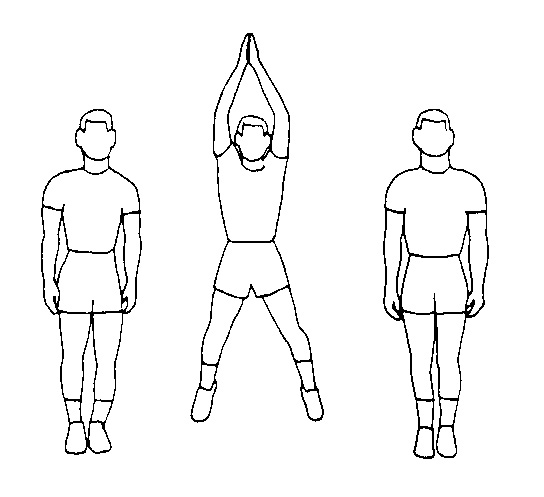
Figure 9.1 - Warm Ups.

ABDOMINAL STRETCH

Position: Stand and extend the arms over the head. Interlace fingers with the palms turned upward or with palms facing each other.

Action: Stretch the arms up and slightly back. Hold for 10 seconds. Stretch to one side and hold for 10 seconds. Stretch in the other direction.

UPPER BACK STRETCH

Position: Stand with the arms extended to the front at shoulder height with fingers interlaced and palms facing outward.

Action: Extend the arms and shoulders forward. Hold for 10 seconds

CREST STRETCH

Position: Stand and interlace the fingers behind the back.

Action: Lift arms behind the back so they move outward and away from the body. Lean forward at the waist. Hold for 10 seconds. Bend the knees before moving to the upright position.

OVERHEAD ARM PULL

Position: Stand with feet shoulder width apart. Raise the right arm, bending the elbow and touching the right hand to the back of the neck.

Action: Grab the right elbow with the left hand and pull to the left. Hold for 10 seconds. Switch hand position and stretch in the other direction.

THIGH STRETCH

Position: Stand

Action: Bend the left leg up toward the buttocks. Grasp the toes of the left foot with the right hand and pull the heel to the left buttocks. Extend the left arm to the side for balance, if necessary. Hold for 10 seconds.

CALF STRETCH

Position: Stand straight with feet together.

Action: Move the right foot to the rear about two feet and slowly press the right heel to the ground. Bend the left knee and push the hips forward while arching the back slightly. Hold for 10 seconds. Switch leg and repeat.

STANDING GROIN STRETCH

Position: Lunge slowly to the left while keeping the right leg straight. Keep the right foot straight ahead and entirely on the floor.

Action: Lean over the left leg while stretching the right groin muscles. Hold for approximately 10 seconds. Repeat with the opposite leg.

SIDE STRADDLE HOP

Start Position: Position of Attention

Action:

(1) Jump slightly into the air while moving the legs more than shoulder width apart.

(2) Jump slightly into the air while swinging the arms downward and returning to the position of attention.

(3) Repeat step 1.

(4) Repeat step 2. Use a moderate cadence.

Figure 9-2. Stretches.

SQUAT BENDER

THE ENGINE

Start Position: Stand with arms straight out and in front of the body. The arms should be parallel to the ground with the palms facing downward.

Action: (1) Bring the knee up to the left elbow. (2) Recover to the start position. (3) Touch the right knee to the right elbow. (4) Recover to the start position. Be sure to keep the arms parallel to the ground throughout the entire exercise. Use moderate cadence.


KNEE BENDER

Start Position: Stand with feet shoulder width apart, hands on hips, thumbs in the small of the back., and elbows back.

Action:

  1. Bend at the knees, lean slightly forward at the waist with the head up, and slide the hands along the outside of the legs until the extended fingers reach the middle of the lower leg.
  2. Recover to the start position.
  3. Repeat step 1.
  4. Repeat step 2. Do not bend knees beyond a 90 degree angle.

THE PUSH-UP

To vary the exercise, you may place the hands together or far apart. Use a moderate cadence.

Start Position: Assume the front leaning rest position with the body forming a generally straight line.

Action:

  1. Keeping the body straight, lower the body until the upper arms are at least parallel to the ground.
  2. Push yourself up to start position by completely straightening the arms.
  3. Repeat step 1.
  4. Repeat step 2..

CROSS-COUNTRY SKIER

Start Position: Attention

Action: (1) Jump slightly in the air and move the left foot forward, landing with both knees slightly bent. At the same time, move the right arm upward and forward to shoulder height and left arm as far back as possible. (2) Jump slightly moving the right foot and left arm forward and the left foot and right arm back. (3) Repeat step 1. (4) Repeat step 2.. Use a moderate cadence.

MOUNTAIN CLIMBER

Start Position: Front leaning rest, with the right foot placed next to the left knee.

Action: (1) The person switches foot positioning so the right foot moves back straight, and the left foot moves forward next to where the right foot was. (2) Switch back to original position. (3) Repeat step (1). (4) Repeat step (2) . Use a moderate cadence and ensure the head is kept looking up.

Figure 9-3. Calisthenics.


Return to Table of Contents